Overview
The Python GUI client is a demonstrator client that gives you a quick feel for the data coming from the robot, and allows you to drive the robot manually through most of the available downstream signal paths. It will also act as a great starting point if you plan your own development in Python.
Usage
To launch the GUI, proceed as follows.
The GUI accepts an additional argument uncompressed, which will cause it to connect to the uncompressed video streams. This will probably increase the stress on the wireless network and reduce performance—it is included only to illustrate how to handle this in your own code.
What's here?
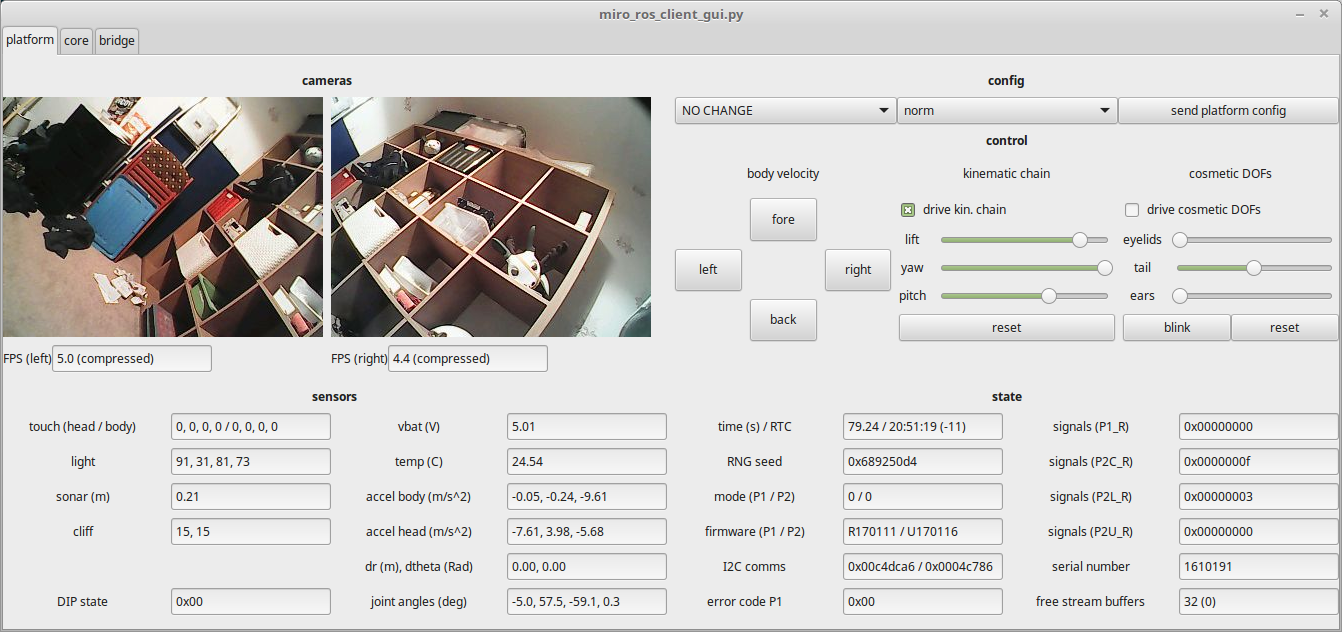
The image above shows the GUI client. It is divided into three pages that correspond to the three interfaces offered by MIRO, the Platform, Core, and Bridge Interface. Each interface page is broken down into a number of panes headed by a bold title, each corresponding to a message stream on that interface.
Platform Interface
Cameras
Streams from the stereo cameras in platform/caml and platform/camr are shown first in the GUI, along with the received frame rates underneath each of the two streams. To change the frame rate (and size), you can use the config pane to the top right of this page.
miro_bridge command-line, also, which may be preferred for configuring your platform long term; see Reconfigure platform.
Audio data from the microphones is not displayed in this GUI (but is available on the network, try rostopic echo /miro/rob01/platform/mics and clap your hands).
Decompression artefacts and occasional corrupted frames in this GUI pane reflect our rather shaky grasp of Python programming—the underlying clean signal streams can be viewed more reliably through rqt_image_view.Sensors
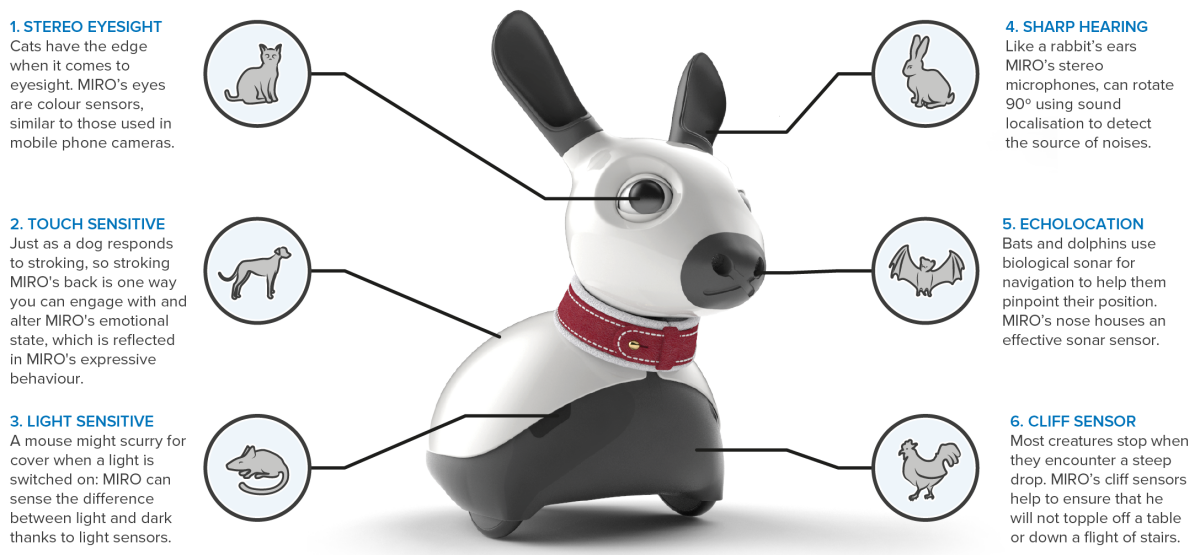
Remember the image to the left? It's an overview of the sensors present on MIRO. As you'll see in the GUI, however, there's a few more, besides.
Sensors
In the next section, all the low bandwidth sensors are shown in text form, from the data message platform/sensors. As shown in the summary diagram, above, you'll find eight touch sensors (0 or 1), four light sensors (0 to 255), sonar range (in metres), and two cliff sensors (actually, surface sensors, reading from 0 for "nothing visible" to 15 "definitely something there").
Alongside, you'll also find the sensors that didn't make the summary diagram. These include the battery voltage, the temperature (Celsius), the twin accelerometers in the body and head (ms-2), the odometry (delta forward and angular motion in metres and Radians), and the proprioceptive state of the kinematic chain (delivered in Radians, but displayed in degrees in the GUI for convenience). Finally, the current DIP switch setting (the red switch block on the P1 board) is here too.
State
Alongside is displayed the contents of the platform/state message, which provides the immediate state of the platform. Much of this is fairly esoteric, but you'll see some streams that may prove useful.
MIRO offers two clocks. The first is a microsecond clock that is zeroed on reset and rolls over every 229 microseconds (a bit less than 537 seconds). The second is a real-time wallclock; this resets to noon on power-up, but if the coin cell battery is installed in the head the state of this clock will be maintained when MIRO's main batteries are off or absent. Unless you disable it with the command-line option no_set_rtc, the clock in P2 is synchronised with the clock in P3 when miro_bridge starts. The clock in P3, meanwhile, is synchronised with internet time the first time a network becomes available on each boot.
Other streams that may be of interest include the RNG seed generated anew from thermal noise each time the main power is cycled and the various signal banks (documented elsewhere). You'll also see "free stream buffers" dipping down if you stream sounds down to the platform (see below).
Config
This panel gives access to the downstream platform/config message. Set camera frame parameters and click on Send to update; this change will be reflected immediately in the camera pane.
Control
The control panel provides access to the platform/control message. This is the downstream message that controls the platform through familiar robotic protocols. On offer are: "body velocity", which treats the base as a differential drive platform (any control vector is supported, naturally, but the GUI only offers four pre-chosen vectors); "kinematic chain", which provides position control for the internal DOFs; and "cosmetic DOFs" which provides similar access for the cosmetic DOFs (eyelids, ears and tail). You can also send a random command to the on-board "blink" pattern generator, here, by clicking "blink".
Core Interface
Config
This panel gives access to the downstream core/config message. Every time you change the state of these checkboxes, a new config message is sent to the platform. Some will have an immediate impact on upstream data which will be visible through the GUI; others will change the behaviour of the core.
All functions of the Biomimetic Core are disabled unless you explicitly enable them, so that MIRO is a straightforward robot platform when first switched on. Enabling a particular signal set in this pane can be used to enable some or all of the core for use by the developer.
You can click on "DEMO" to set the configuration equal to that used in MIRO's demonstration mode. A connected MIRO will—more or less—be switched into demo mode, and begin to behave in a familiar way.
Control
This pane gives access to core/control, specifically to affect drive and body push. Each affect drive buttons immediately sets both MIRO's mood and emotion states to a chosen part of affect space. The body push buttons each drive a chosen point (just in front of MIRO's nose) in the specified direction, providing a simple illustration of how body push can be used to drive MIRO's motion.
BODY_ENABLE is not turned on, "body push" will not respond, since the body module of the Biomimetic Core is required to respond to body push commands and move the motor model.State
Under state, we can see reports from core/state.
Spatial
If the flag SPATIAL_SEND_PRIORITY is turned on (and SPATIAL_ENABLE is on, besides) the spatial priority processor will send the state of the priority output maps upstream for monitoring, and they are displayed in this pane. See Biomimetic Core for more details.
Bridge Interface
Config
Here you can send bridge/config. Only two flags are available, at time of writing.
Stream
If the connected bridge has sounds loaded into memory, this pane provides access to trigger the streaming module of the bridge through the bridge/stream message.